

 |
> E&O/GL Insurance for Home Inspectors Competitive Rates, Broad Coverage, Free Risk Management, online inspection support for tough questions, discounts on education and more... Professional Coverage, Competitive Pricing Shop OREP today! |
>> Editor’s Note: To help you stay up-to-date and connected, OREP/Working RE has established a Coronavirus (COVID-19) Discussion and Resource Page where you can share your thoughts, experiences, advice and challenges with fellow inspectors. See what Inspectors are saying here!
>> Take the Coronavirus: National Home Inspector’s Survey. Provide your industry feedback.
Stone Veneer: Friend or Foe? The Science Behind Your Inspection
by Tom Feiza, Mr. Fix-It, Inc. HowToOperateYourHome.com
Stone and brick veneer for residential construction have seen dramatic changes with the last few generations of products. The industry has moved from “real” brick and stone veneer supported by a foundation (an old friend), to an adhered, manufactured product supported by the wall frame; the question is whether this is friend or foe. In many parts of the country, adhered veneer is the new industry standard perhaps because of cost and appearance. Many builders just call both systems stone or brick.
Originally, the adhered products were not that “natural” in appearance and could be easily identified. Now the manufactured stone and brick look real. Natural thin-cut real stone is also used as an adhered veneer leading to more confusion. Quality products have cornerstones cut in an “L” shape so the product wraps around corners like a full-depth stone veneer. The change has not taken place without casualties. The adhered veneer needs to be installed like a stucco/EIFS product with proper layering of moisture resistant materials and flashings. There have been many system failures and expensive repairs in wet climates.
As a home inspector, you need to identify the veneer product properly, know the proper installation methods and know the signs of failure. You need to understand how the products perform in your climate. This basic primer/overview will help you identify and understand the products and the all-important drainage of water from the veneer and wall assembly.
Stone Veneer vs. Adhered Masonry
In the last 20 years, adhered veneer of some type has become a common exterior finish replacing real masonry veneer. We use different terms for the adhered product—faux stone or brick, adhered stone, thin-cut stone, manufactured stone or veneer, lick and stick and the list goes on. The big differences are the product thickness, drainage, and how it is assembled on the exterior wall.
All Siding Leaks: Brick, Stone, Wood, Vinyl, Aluminum, Faux Stone
Yes, all siding leaks, even real brick/stone veneer. How should brick/stone veneer be properly drained to prevent water damage to the wall assembly? As an inspector you need to understand the different siding products and how the wall assembly is drained to keep water out of the structure. There are visible clues to the flashings installed—you can see the edges. You may already know the visible signs of failure/moisture—damaged stone, flaking stone, salt stains, missing mortar and water stains. Water stains may also be visible inside the home around windows and at the top of the basement wall.
“Real” Stone, Brick and Mortar Leaks:
Water will flow through exterior brick veneer and can damage the structure behind and below the brick. For many years, structures have been protected by drainage planes, flashing, and water-resistant barriers. In older construction, wide overhangs often helped provide this protection. Figure 1 shows general brick veneer construction. Note the air space behind the brick to drain water and stop capillary action. The wood frame is covered with a water-resistant barrier. Flashing directs water to drain over the foundation. Thin metal strips “tie” the brick to the wall for horizontal support.
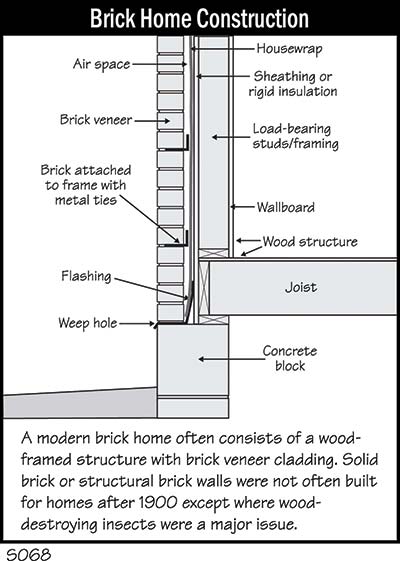
Figure 1: Brick Veneer Construction – A modern brick home often consists of a wood-framed structure with brick veneer cladding. Solid brick or structural brick walls were not often built for homes after 1900 except where wood-destroying insects were a major issue.

Figure 2: Water Management Details – All masonry can leak. One-inch spacing, flashing, weeps, and water-resistant barriers drain the water to the outside and protect the wood framing.
“Real” Stone, Brick and Mortar Leaks:
Water will flow through exterior brick veneer and can damage the structure behind and below the brick. For many years, structures have been protected by drainage planes, flashing, and water-resistant barriers. In older construction, wide overhangs often helped provide this protection. Figure 1 shows general brick veneer construction. Note the air space behind the brick to drain water and stop capillary action. The wood frame is covered with a water-resistant barrier. Flashing directs water to drain over the foundation. Thin metal strips “tie” the brick to the wall for horizontal support.
Details of “Real” Brick/Stone Water Management:
Figure 2 shows additional water-management details. There must be a gap of at least one inch for drainage. The water-resistant barrier can be traditional tar paper, housewrap, or a specialty product. The weep shown here is an open mortar joint. There should be an insect-resistant material covering—not just a hole. An optional drainage mesh to keep mortar out of the weeps is also shown.
What can you expect to see? In residential construction, flashing and weeps are often not visible. Figure 3 shows a typical situation in which flashing is buried in the mortar joint. Who knows why? Perhaps masons do this to hide the “ugly” flashing. During an inspection, you will often find that the lower stone/brick is buried beneath landscaping; you’ll have no idea whether there are flashings. You certainly can’t see into the wall structure.
Flashing that’s visible in residential construction might come as a surprise (Photo 1). If you look closely, you can see a small round weep hole just above the dark flashing. An open mortar joint and covering for a weep is even less common (Photo 2).
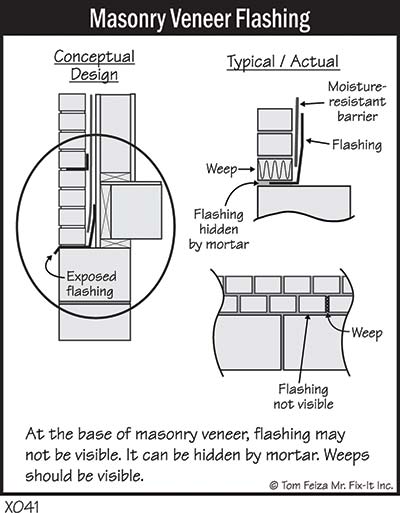
Figure 3: Masonry Veneer Flashing – At the base of masonry veneer, flashing may not be visible. It can be hidden by mortar. Weeps should be visible.
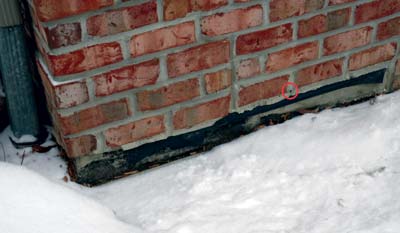
Photo 1: Flashing in Residential Construction with weep hole
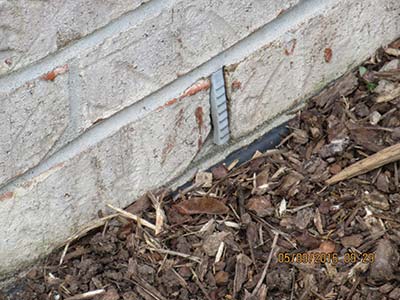
Photo 2: Open mortar joint and covering for a weep
The takeaway: Real brick veneer should have flashings and weeps. Don’t confuse real brick or stone veneer with an adhered stone or brick veneer—a synthetic stucco type of assembly.
Adhered Masonry Veneer—Faux (Artificial)
Adhered veneer of some type has become a common exterior finish replacing real masonry veneer. As noted, we use different terms for the adhered product—faux stone or brick, adhered stone, thin cut stone, manufactured stone or veneer, lick and stick and more. The big differences are the product thickness, drainage, and how it is assembled on the wall. (Most consumers and builders just refer to both products as stone or brick.)
Figure 4 shows the basic difference. Real brick or stone veneer is supported by the foundation and there is an air gap with a water-resistant barrier and flashings for drainage. Adhered brick or stone is attached directly to and supported by the frame of the home. Adhered stone requires a specialized water-resistant barrier and special flashings—there is no air gap.
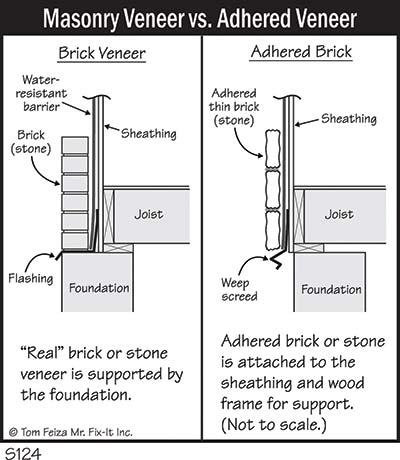
Figure 4: Masonry Veneer vs. Adhered Veneer
Adhered Veneer
The installation and water barrier/drainage details for adhered brick/stone are similar to synthetic stucco (See Figure 5). There should be multiple layers of a water-resistant barrier, metal lath, mortar bed and then the product is adhered with mortar. The proper assembly requires a weep screed at the lower edge and four-to-six-inch clearance to grade. The clearance to roofs, supported concretes, and walk is often one to four inches. There are critical requirements for flashing over all penetrations like windows and doors plus edge sealants to windows and doors.
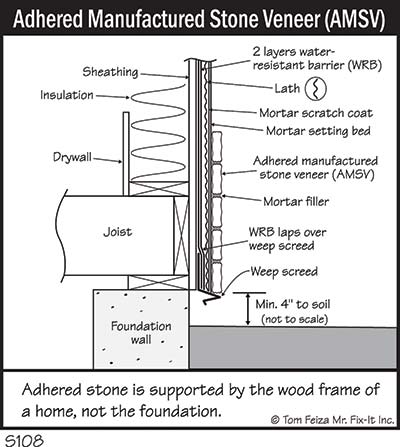
Figure 5: Adhered Manufactured Stone Veneer (AMSV) – Adhered stone is supported by the wood frame of a home, not the foundation.
You should look for specific installation requirements for adhered products used in your area. A good general reference is The Installation Guide and Detailing Options for Compliance with ASTM C1780 (78 pages) by the Masonry Veneer Manufacturers Association. Google MVMA and you will find references. Product manufacturers also provide installation instructions or a reference to code and industry standards.
(story continues below)

› Compare the cost of E&O in 5 min.
(story continues)
Problems with Adhered Stone
I have seen many issues with the installation of adhered stone. It is rarely installed correctly in my cold-wet climate. Take a look at Photo 3. You can see the moisture stains from water entering the wall. There should be a gap and flashing to the roofing. Water will be trapped against the stone by the angle of the vertical wall. This home had major leak issues into the front entrance and the basement below this area. The owner had replaced walls and flooring not understanding the source of the water leak so the water damage continued.
Photo 4 shows classic missing details—no kickout flashing from the sidewall to the gutter; no flashing and spacing from the adhered stone to the shingles. The small gap between the shingles and faux stone improperly sealed with “liquid black flashing” to attempt a repair.
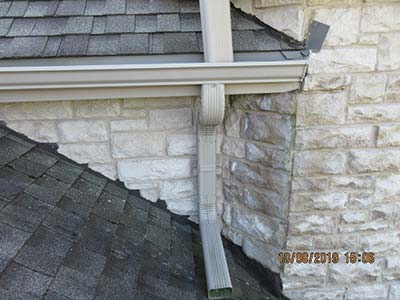
Photo 3: Adhered Masonry Veneer Issues
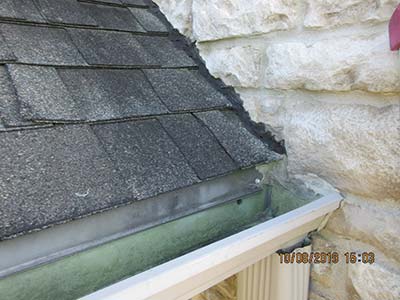
Photo 4: Adhered Stone – No Kickout Flashing
Climate and Local Construction Details Make a Difference
What can an inspector do? As with all building products, “real” veneer and adhered veneer is affected by the local climate. If you are in a dry climate there is much less worry about ongoing water intrusion. Everything just dries out. If you are in a wet-cold climate, the product must be installed properly or leaks and hidden defects will surface after a few years. Homes with large overhangs limit rainwater hitting the stone and limit water intrusion. Homes with shallow overhangs and/or overflowing gutters or undersized gutters are always a problem. Water intrusion can also occur on the side of the home wet by the prevailing wind/rain.
Adhered Veneer
Inspectors should recognize the difference between adhered masonry and “real” masonry veneer. Study the installation details for adhered masonry and carry them with you during inspections. Identify any visible adhered stone installation omissions/defects and call for further evaluation. If a flashing is missing, identify that issue. I believe adhered stone needs a specialized inspection just like synthetic stucco. Structural damage is often hidden behind the adhered stone and not visible to the inspector.
Real Stone and Brick Veneer
Real brick veneer should have flashings and weeps. Don’t confuse real brick or stone veneer with an adhered stone or brick—the synthetic stucco type of assembly. If you can’t see a drainage system, state that in your report and list the limitations. Note whether there is insufficient clearance from the structure to soil. Note any visible water damage that requires further investigation.
About the Author
Tom Feiza has been a professional home inspector since 1992 and has a degree in engineering. Through HowToOperateYourHome.com, he provides high-quality marketing materials, books for homeowners, and illustrations that help professional home inspectors educate their customers. E-mail Tom (Tom@htoyh.com) with questions and comments, or phone (262) 303-4884. Copyright© 2021 by Tom Feiza, Mr. Fix-It, Inc. Reproduced with permission. Visit Htoyh.com for more information about building science, books, articles, marketing, and illustrations for home inspectors.
OREP/WRE Coronavirus Discussion and Resource Page
Coronavirus: National Home Inspector Survey
Free Risk Management Online Course Claims and Complaints: How to Stay Out of Trouble
Available Now
Presenter: David Brauner, Senior Insurance Broker OREP
David Brauner, Senior Broker at OREP, shares insights and advice gained over 25+ years of providing E&O insurance for inspectors, showing you how to protect yourself and your business. Watch Now!
Note: The Summer 2021 issue of Working RE Home Inspector is mailing now to over 25,000 home inspectors nationwide. OREP Insureds enjoy guaranteed delivery of each print magazine and many more benefits.