

 |
> E&O/GL Insurance for Home Inspectors Competitive Rates, Broad Coverage, Free Risk Management, online inspection support for tough questions, discounts on education and more... Professional Coverage, Competitive Pricing Shop OREP today! |
When Siding Leaks Into the Basement
by Tom Feiza, Mr. Fix-It, Inc., HowToOperateYourHome.com
All siding leaks! Got it? Wood, vinyl, fiber cement, wood composition, plywood, stucco, synthetic stucco and every other type of siding and cladding can leak. So how do we protect the structure of a home?
Water-resistant barriers, flashing, proper clearances and other construction details. “But we never had this problem in the old days!” Right. But remember how drafty those old homes were? They allowed lots of air and heat to leak outdoors. In many cases, when water penetrated under the siding, the walls dried out on their own. Damp basements were also common and not a cause for concern.
Old homes had other big advantages. They were built with simple roof lines and simple wall designs. They had wider overhangs to keep water away from the structure. In those days, carpenters carefully worked around the tarpaper and builderspaper that were used as water-resistant barriers. Construction materials like real wood, plaster and wood trim were not prone to mold. Homes were built on the available “high” ground.
Today’s Home: Tighter and Warmer
Today we have tightly insulated new homes that hold moisture and heat. This makes them much more comfortable and energy- efficient. New homes have exterior water-resistant barriers and internal vapor retarders. We have also tightened up and insulated most older homes. We expect basement to be dry enough to serve as living space.
If water enters the wall of a new, tight home, there’s no air movement to dry it out. Today’s construction materials also are prone to water damage and mold. Oriented strand board (OSB), paper-covered drywall, and synthetic products are often made of partially processed/digested wood, and they are ready to rot and mold.
Installation Errors Create Leaks
Improper installation of siding, brick and flashing creates leaks in the basement that can cause structural rot and mold within exterior walls. Let’s look at a typical example. This home has a bay next to the front door (See Figure 1: Exterior Bay Construction.) Water stains appear on the foundation walls below the bay (See Figure 2: Interior Bay Basement.)
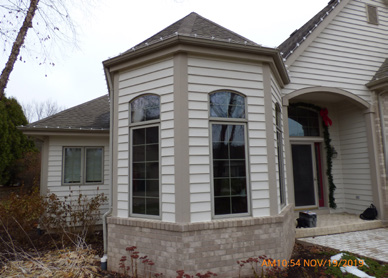
Figure 1: Exterior Bay Construction
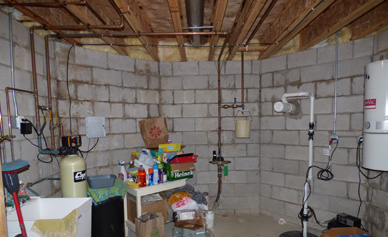
Figure 2: Interior Bay Basement
The stains start high on the wall. At times, water runs down the wall and puddles on the floor. The owner stated that this 19-year-old home has always leaked.
The original builder corrected the leaks with exterior caulk. (I call that applying liquid flashing.) For a few years the leak was minor, and it appeared to be fixed. But later, leaks occurred again, and they have become more severe with time. These leaks occur with wind-driven rain or heavy rain.
What’s Going on Outside?
At first glance, the materials in this area seem to be well-maintained. But a closer look reveals several problems. This area has a small roof overhang, and the bay faces the direction of most wind-driven rain. We think there are flashings over the windows, but the windows are caulked to the siding. The vertical trim appears to extend behind the brick with no flashing over the brick. (See Figure 3: Where is the Flashing?)
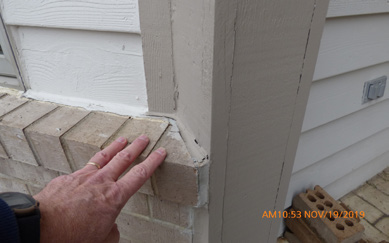
Figure 3: Where is the Flashing?
Note that this is real brick, not adhered masonry. At the top of the brick, the veneer cap has no or very little slope away from the building. The small flashing below the wood siding is caulked to the siding (See Figure 4: Cap with No Slope or Flashing.) All of these improper details allow water to penetrate behind the brick. We’ve found the source of leaks into the basement.
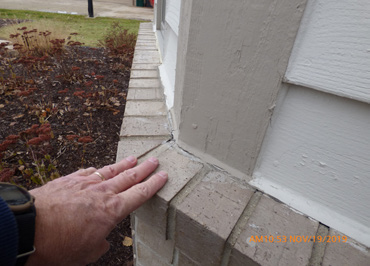
Figure 4: Cap with No Slope or Flashing
Down at Ground Level
Moving down to the soil level: The weep is just a hole/rope left in the mortar joint (See Figure 5: Weep High in the Brick.) Why is the brick buried in the soil? The lower edge of brick veneer should not be exposed like this. I dug out some soil to examine the joint atop the basement block/brick veneer and the weep hole/rope. There is no visible flashing at the bottom of the brick veneer. The weep should be at the bottom of the brick—otherwise, water can pool in this area. In my part of the country, builders commonly bury the lower veneer flashing in the mortar joint so it will not be visible. I think that’s a mistake.
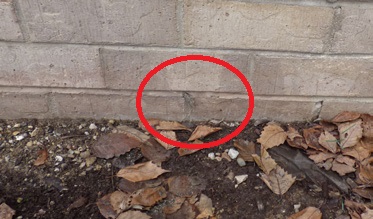
Figure 5: Weep High in the Brick
Overview of Potential Problems
There are many ways that improper siding, brick veneer and flashing can cause moisture problems (See Figure 6: Masonry Veneer Flashing—Problems): poor or no flashing over the brick, no low weep, no low flashing in the brick, and misapplication of the exterior water barrier.
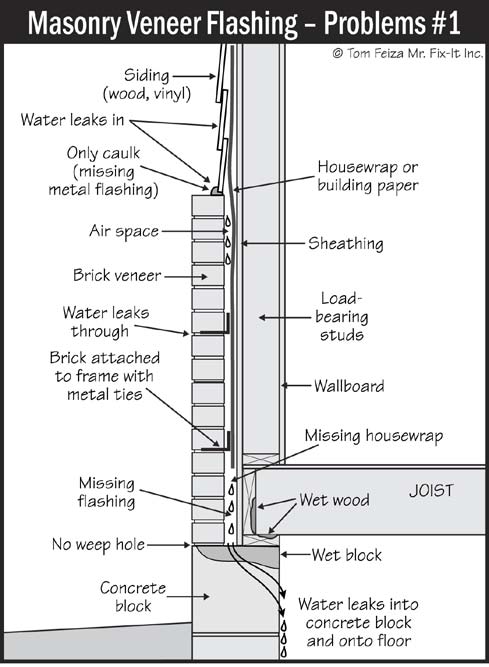
Figure 6: Masonry Veneer Flashing – Problems
Flashing Done Right
When flashing is properly installed, it should direct water over the top of the brick (See Figure 7: Masonry Veneer Flashing.) While there may not be flashing over the full length of the veneer as shown here, there must be flashing at the base of the veneer with a weep at the bottom of the brick to drain water. In this case, we don’t know whether a moisture-resistant barrier was placed on the wall and layered properly with flashing. We do know that skimpy overhangs and exposure to the rain from most rainstorms, combined with poor construction details, cause the leak in the basement.
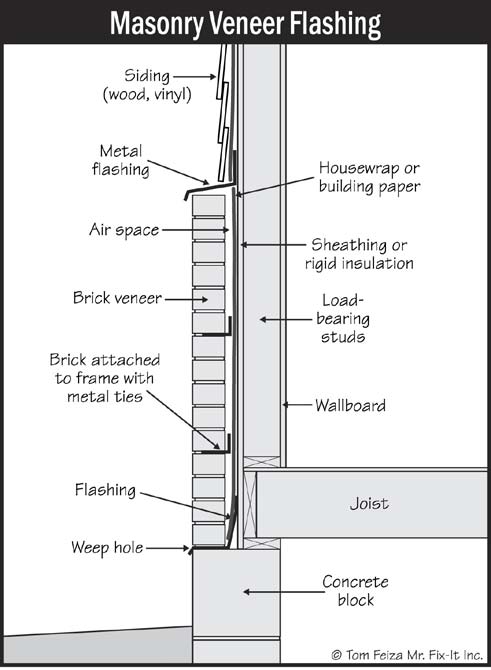
Figure 7: Masonry Veneer Flashing
Crucial Steps You Must Take
You must never overlook this type of situation, which can require expensive repairs. Leaks in the basement should always be reported, although you don’t need to identify the reason or recommend the following methods of repair.
1. Remove siding and trim above the brick to check for a water barrier. If there is none, remove all siding, trim and brick and replace these elements, along with a water barrier and proper flashing.
2. Inspect for rot and mold, and correct as needed.
3. If there is a water barrier, remove siding and trim so flashing can be placed over the brick and under the water barrier.
4. Remove top layer of brick and pitch it away from the wall, or install long metal flashing that extends over the top of the brick.
5. Lower the weeps to the base of the brick if there is flashing and a water barrier.
6. Backfill the area around the brick and the top of the basement wall with free-draining stone. You can cover this with a weed barrier and decorative stone. Pitch the soil in this area away from the basement.
7. The extent of the work will depend on the existing condition of the water barrier and flashings and the damage from rot or mold. Install all materials per current standards, practices and codes.
(story continues below)

(story continues)
Inspector Takeaway
Always note missing horizontal flashing, improperly caulked flashing, and stains or leaks on basement walls. The note may say “potential for leaks—suggest further evaluation” or “signs of extensive leaks—requires further evaluation.” A visual inspection does not include digging into the soil or exposing moisture-resistant barriers.
Keep in mind that all siding leaks, so flashing must be used to protect the wall assembly. Remember that signs of leaks in siding and brick can appear in the basement. Understand the installation instructions for modern siding and cladding. Visit manufacturers’ websites and study their installation instructions for siding, brick, adhered masonry, windows and exterior trim. Be aware of essential exterior construction details, and look for them during your inspection. Always report any visible sign of excessive moisture.
To learn more, attend Tom’s presentations at educational sessions for ASHI chapters and local organizations. Tom can also provide his knowledge for your educational event; contact him at Tom@HTOYH.com.
About the Author
Tom Feiza has been a professional home inspector since 1992 and has a degree in engineering. He has inspected over 9,000 homes. Copyright 2020 by Mr. Fix-It, Inc.
Visit HowToOperateYourHome.com (or htoyh.com) for more information about building science, books, articles, marketing, and illustrations for inspectors. Tom helps professional inspectors help their customers and boost their business. E-mail Tom (Tom@misterfix-it.com) or call 262-303-4884. Tom also provides educational presentations for home inspector events.
OREP/WRE Coronavirus Discussion and Resource Page
Coronavirus: National Home Inspector Survey
Free Risk Management Online Course Claims and Complaints: How to Stay Out of Trouble
Available Now
Presenter: David Brauner, Senior Insurance Broker OREP
David Brauner, Senior Broker at OREP, shares insights and advice gained over 25+ years of providing E&O insurance for inspectors, showing you how to protect yourself and your business.. Watch Now!
Note: The Winter 2020 issue of Working RE Inspector is mailing now to over 25,000 home inspectors nationwide. OREP Insureds enjoy guaranteed delivery of each print magazine and many more benefits.