

 | > E&O/GL Insurance for Home Inspectors Competitive Rates, Broad Coverage, Free Risk Management, online inspection support for tough questions, discounts on education and more… Professional Coverage, Competitive Pricing Shop OREP today! |
Mysterious Leaks into Home and Basement
The Science Behind Your Inspection
By Tom Feiza, Mr. Fix-It, Inc. HowToOperateYourHome.com
New Home—Inspection—Purchase—Then Leaks
The one call a home inspector never wants: “You inspected my home a year ago and now water leaks into my home every time it rains.” Ouch! Worry? Headache! Legal? Insurance? Lost Sleep?
Inspectors don’t have x-ray vision, nor can they predict the future performance of a home. They must depend on visual signs and clues that exist at the time of the inspection. In this leaky home case, there were no significant signs of leaks at the inspection but the inspector did not mention some flashing issues.
The Leaks, Background:
The homeowner called me to help determine why his newly purchased, 20-year-old home was leaking. He wanted to know who was responsible as well as the necessary corrective work. He had owned the home about one year and leaks occurred at the rear of the home near the deck. Water leaked in below doors and windows on carpeting and over the top of the basement wall. He also knew the home had experienced hail damage and the seller recently replaced roofing, siding, and parts of the decks.
When investigating water intrusion, I often start by taking a quick look at the outside of the home to orient myself with the structure. Then I look at the signs of leaks or active leaks while the owner explains the leaks issues. In this case, the home only leaked with heavy wind and rain. The owner had videos and pictures.
Outside
The front of the “leaker” was typical 20-year-old construction. There was adhered masonry with vinyl siding. There were no obvious issues but, I always question the installation of adhered masonry. Looking further, I saw the adhered stone was too close to the soil and entrance stoop. Flashings weep screeds were not visible, but leaks had not occurred near the adhered stone (See Figures 1 and 2).
Leaks were occurring at the rear of the home per the owner (See Figure 2). Some leaks were occurring on the second story near the deck on the exterior wall. Leaks were also occurring at the top of the basement wall below the deck. I suspected roof, gutter, flashing, water barrier, and deck issues.
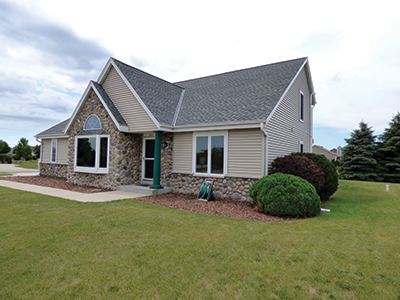
Figure 1: Front of Leaker
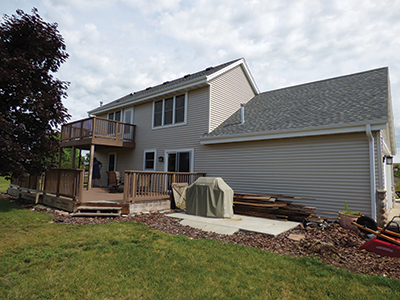
Figure 2: Rear of Leaker, Note Decks
(story continues below)

(story continues)
Next Step—Inside with the Leaks
Inside on the second story near the deck, the owner had pulled back carpeting. (See Figure 3). The carpet was stained below the exterior door. The owner stated the carpet was wet during heavy rain. The cutout in the carpet was for the heating duct below the window.
At the kitchen area below the upper deck there were no visible signs of moisture damage and the owner reported no issues. I checked the exterior wall drywall with a moisture meter and found slightly elevated moisture levels but nothing significant or wet.
At the basement below the deck there were slight water stains (See Figure 4). The wall was block construction with very slight tracks of water down the wall. The owner stated water ran down the wall at the laundry tub and puddled on the floor. He had videos showing significant water entry—but there was limited visual evidence during my visit.
Figure 5 shows a close-up of the top of the leaking basement wall. The limited visual evidence is a slight stain on the 2-by-4 between the floor trusses. You can also see a stain on the lower edge of the right truss. Below this truss, there are barely visible stains/streaks on the block.
The owner’s video clearly showed the significant leaks—there was little visible evidence for me to see. The home inspector who was there a year earlier noted none of this and it was not readily visible to him.
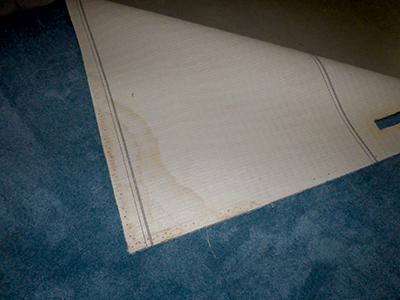
Figure 3: Stain on Second Floor Carpet
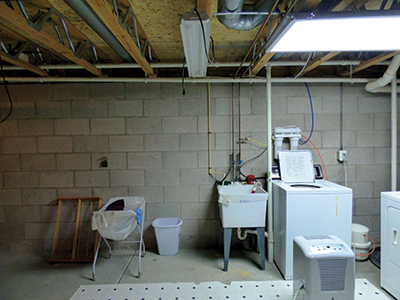
Figure 4: Basement Leaks Below Deck

Figure 5: Stains at Top of the Basement wall
Next Step—Outside Looking for Source of the Water
I always start at the top of a leak area and work my way down. I walked the roof and inspected the shingles, gutters, valleys, overhangs, and flashings but saw no real issues.
Figure 6 shows the second floor deck and siding. My black folder for notes is laying on the deck. With a casual look, the siding and deck looks pretty good. But what about the flashing of the deck surface below the siding?
Figure 7 shows lifting the siding just above the deck trim and looking at bare OSB. The vertical trim at the deck is fastened directly to the exterior OBS below the siding. Where is the house wrap (water barrier) and where is the flashing to direct water over the deck walking surface? Where is the water barrier behind the deck trim?
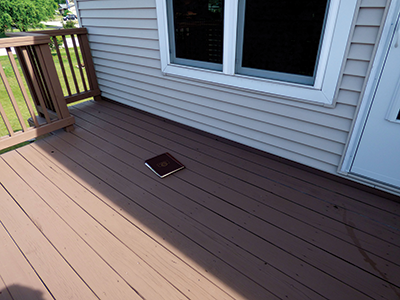
Figure 6: Deck and Siding
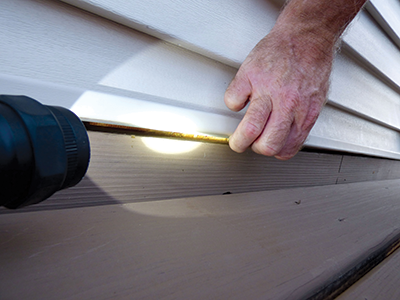
Figure 7: No Flashing, Bare OSB
Next Step—Exterior Vinyl Siding Near the Deck
Given the lack of a moisture barrier on the OSB sheathing and no deck flashing, one starts to wonder about the siding installation. All siding leaks. Vinyl siding leaks. Siding manufacturers all require a water/moisture resistant barrier and proper flashings. Codes and code officials require a moisture resistant barrier and flashing in most areas.
Look at Figure 8, this illustration shows the correct installation details. Since all siding leaks, we need house wrap, tar paper or a water resistant barrier below the siding. Water then flows over the water barrier to a flashing that directs water outside any penetration or attachment to the wall. Simple right?
Looking Under the Siding
Home inspectors would not lift siding, but I had a good idea the siding installation was defective and I was investigating a water leak. So, with a siding removal tool, I popped up the lower edge of the vinyl siding in several areas around the deck and then around the home.
Figure 9 shows one area where I lifted the vinyl siding. As I lifted the siding, water dribbled out and streaked down the siding below (There had been recent light rain). The wall was covered with yellow extruded polystyrene insulation. Over this rigid insulation was thin, clear plastic like you would use for a cheap drop cloth when painting. One joint on the thin plastic was covered with a branded house wrap tape.
Figure 10 shows another area under the vinyl siding. The yellow extruded, ridged insulation is not covered in the upper area. In the lower area, it is covered with clear plastic packaging tape. You can see the saw-tooth edge of the tape—it is designed to be easily torn without a tape dispenser and cutting edge. Multiple layers of the packaging tape are visible.
Figure 11 shows water running out below the siding. The rigid insulation is bare with some house wrap tape, but no tape at one open vertical joint.
I continued to lift about 10 areas of the vinyl siding and found similar conditions. Either there was no moisture barrier, incorrect clear plastic, incorrect tape or no tape. Flashing was not installed at penetrations through the wall. Flashings were not installed over horizontal attachments. I never found any proper water resistant barrier.
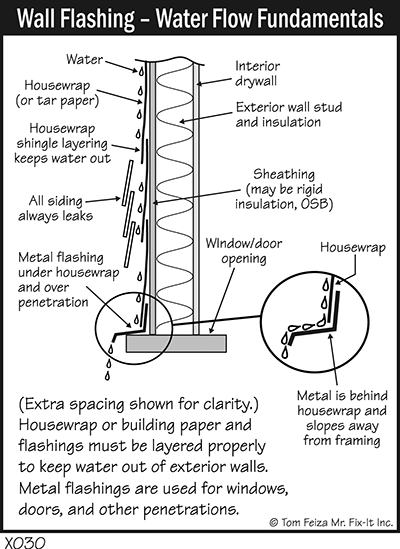
Figure 8: Wall Flashing—Water Flow Fundamentals
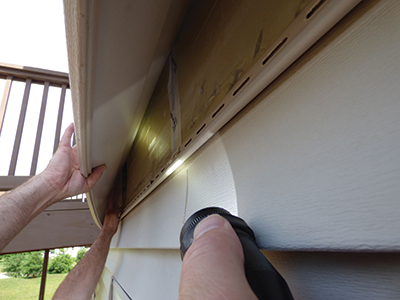
Figure 9: Clear Plastic House Wrap?
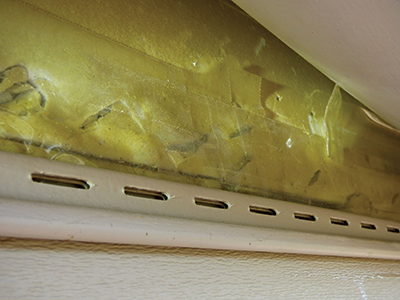
Figure 10: Packaging Tape and No House Wrap

Figure 11: Water Running Out of Siding
So, What Happened?
The owner researched the area prior to my visit and found there had been heavy hail damage. The seller had received money to replace the roof and siding. He also found the roof and siding was done without the required municipal permit. In our area, this should have been disclosed by the seller in real-estate transaction paperwork required by the state.
Water entry occurred because of all the siding leaks and there was no proper moisture resistant barrier. Once water entered behind the siding there was no water barrier and flashing to keep it outside. At window and door penetrations, water ran in through the framing to the subfloor and carpeting. Once water entered the wall assembly, it flowed down through the hidden framing onto the trusses and the top of the block basement wall. The wall cavities are probably wet where water entered and moved.
The Fix?
Expensive—remove all the siding and install a water resistant barrier and flashings. Fortunately, some of the house wrap manufacturers now include instructions to flash around an installed window and door. Flashing at the deck should include a barrier behind and over all ledgers and horizontal trim.
At this point the owner was not ready to dig into the adhered stone veneer—but I know there were original construction issues with the stone.
The home inspector did an OK inspection—I wish he would have noted the lack of deck flashings and the adhered stone issues. BUT, adhered stone is almost always improperly installed in this area of the country and if protected from rain by overhang and gutters—it may not leak.
The Takeaway
Inspectors should understand the principles of protecting a home from rain water with water resistant barriers and flashings. When you see signs of minor water intrusion, you should call for further evaluation. Stained carpet and stained framing should be identified.
But inspectors don’t lift siding and have the advantage of an owner identifying the active leak issues. Inspectors must rely on understanding the science behind home performance and noting issues that may result in serious, non-visible issues.
With this home, corrective work must be completed to prevent future serious structural issues, rot, and mold.
About the Author:
Tom Feiza has been a professional home inspector since 1992 and has a degree in engineering. Through HowToOperateYourHome.com, he provides high-quality marketing materials, books for homeowners, and illustrations that help professional home inspectors educate their customers. Copyright © 2023 by Tom Feiza, Mr. Fix-It, Inc. Reproduced with permission.
Visit HowToOperateYourHome.com for more information about building science, books, articles, marketing, and illustrations for home inspectors. E-mail Tom at Tom@htoyh.com with questions and comments, or phone (262) 303-4884.
OREP Insurance Services, LLC. Calif. License #0K99465