

 | > E&O/GL Insurance for Home Inspectors Competitive Rates, Broad Coverage, Free Risk Management, online inspection support for tough questions, discounts on education and more… Professional Coverage, Competitive Pricing Shop OREP today! |
Attic Defects and Goofs: The Science Behind Your Inspection
By Tom Feiza, Mr. Fix-It, Inc. HowToOperateYourHome.com (htoyh.com)
Inspecting an attic is always a challenge because of limited access, temperature, and safety—BUT attics are a very important part of a thorough inspection and report. We need to inspect insulation, vapor barriers, ventilation, bath and kitchen venting, and the structure of the underside of the roof. What are some common and serious defects? How did they occur?
Large Gaps in Insulation
We have all inspected attics and noticed large gaps in the insulation covering the ceiling of the living space. Or maybe they were just small areas of uneven insulation. We make a note in our inspection report about gaps in insulation, but never how they got there.
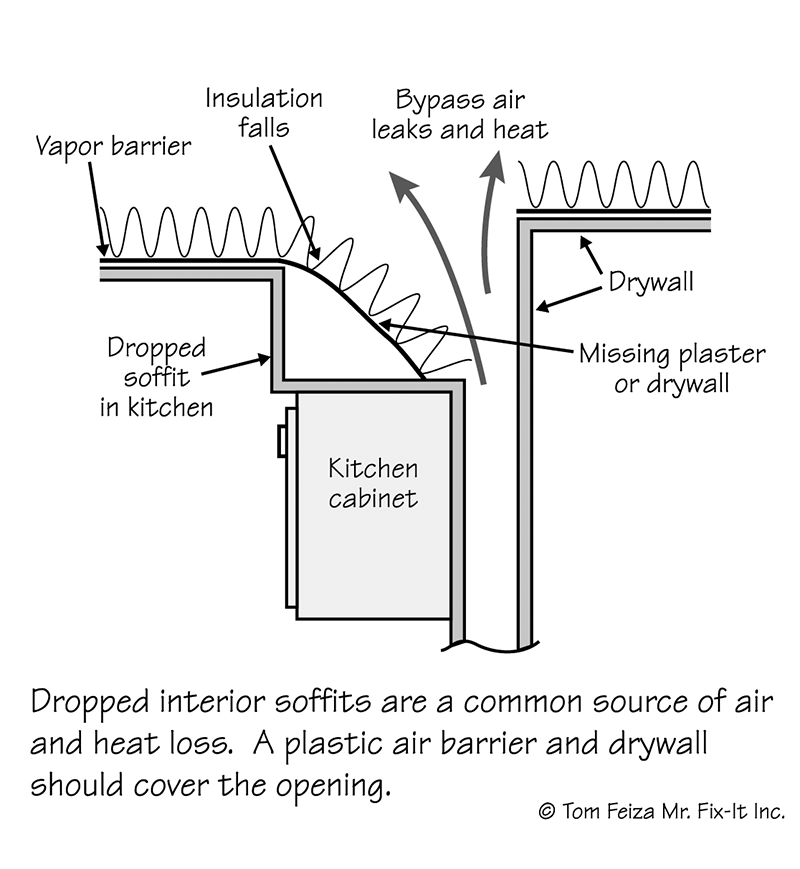
Many homes are constructed with dropped soffits over the kitchen and bath. These dropped soffits fill in gaps above cabinets.
At some point, an insulation contractor or carpenter spread a plastic Visqueen vapor barrier over the rough framing on the underside of the ceiling and inside exterior walls to stop airflow from the heated space. As they covered the ceiling, that dropped soffit framing was in the way. So, what did they do? Just skip it? (See Figure 1: Heat and Bypass at Soffit).
An All-Too-Common Fault
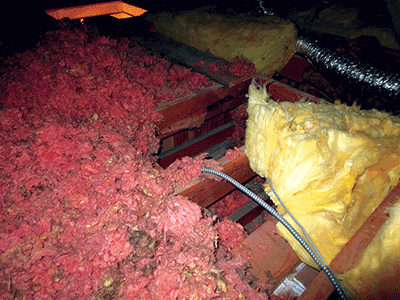
It’s very common to see this faulty installation: the dropped soffit is not blocked at the attic floor and is not covered by the vapor barrier. These gaps in attic insulation and the vapor barrier create a huge potential problem—heated air and moisture will pour into the attic. The moisture will result in condensation on the cold roof structure, then rot and mold (See Figure 2: Insulation at Dropped Soffit).
When you notice gaps or disturbances in the insulation, lack of blocking to support the insulation, or lack of a continuous vapor barrier, check the roof sheathing for signs of condensation and moisture. Look at the insulation for black stains that result from filtering dirt out of the air flow.
Gaps at Chimneys
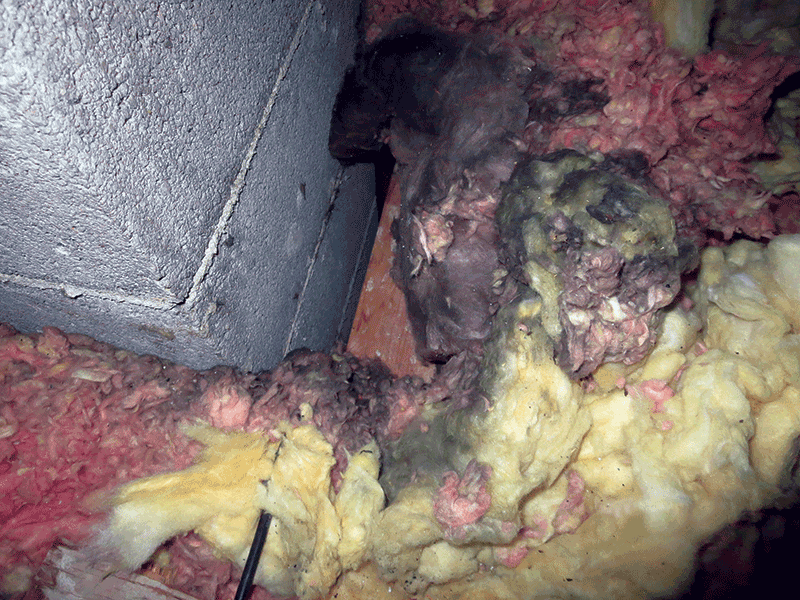
Air gaps are required at chimneys for fire safety, but as we tighten homes the large gap and air leaks can cause ice dams and attic moisture issues. Today when insulation is added to any attic, proper fire-resistant air sealing must be completed around all penetrations from the heated space, including the chimney. In Figure 3: Insulation Gap at Chimney, note the insulation and the black stains. The fiberglass insulation is a great dirt filter for the air flow from the basement to the attic. Talk about stack pressure!

Figure 1: Heat and Bypass at Soffit
Figure 2: Insulation at Dropped Soffit

Figure 3: Insulation Gap at Chimney
Ventilation—Different Types Serve Different Needs
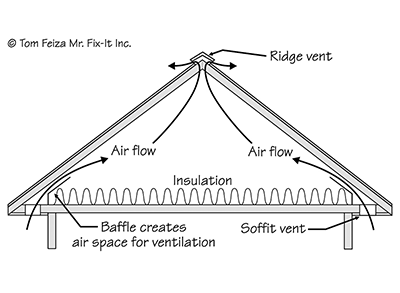
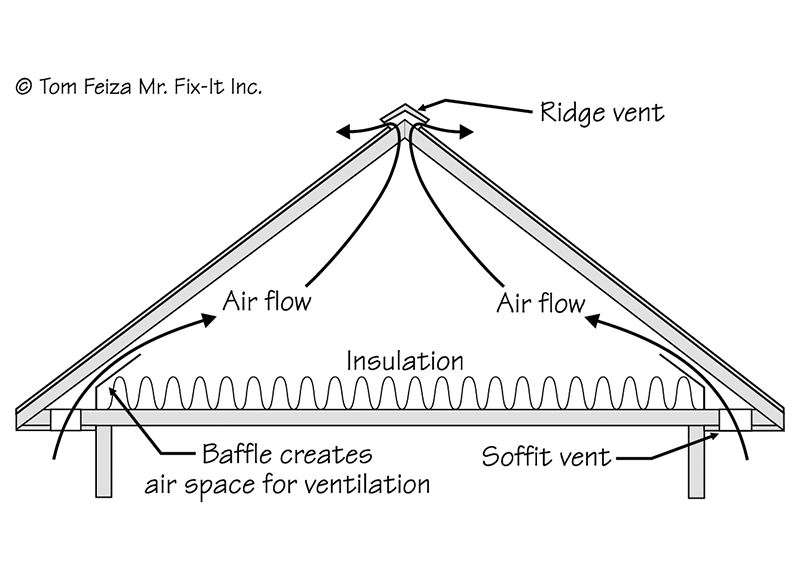
In older construction, upper attic vents, can vents, static vents and box vents are placed high near the ridge of the roof. Lately, these have been replaced with a continuous ridge vent: an opening in the ridge of the roof covered with a mesh or plastic frame and shingles (See Figure 4: Attic Ventilation—Ridge Vent).
In static vent systems, wind or rising heat in the attic pushes air from lower vents to upper vents—removing heat and moisture. This worked well with simple roof designs. Older homes often had gable end vents, too, which worked in combination with soffit vents.
(story continues below)

(story continues)
A Powered Fan Can Help…Right?
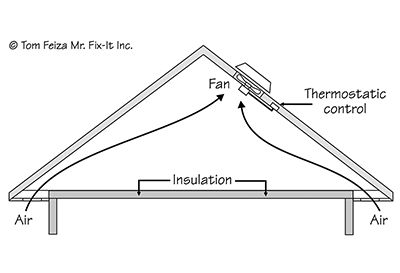
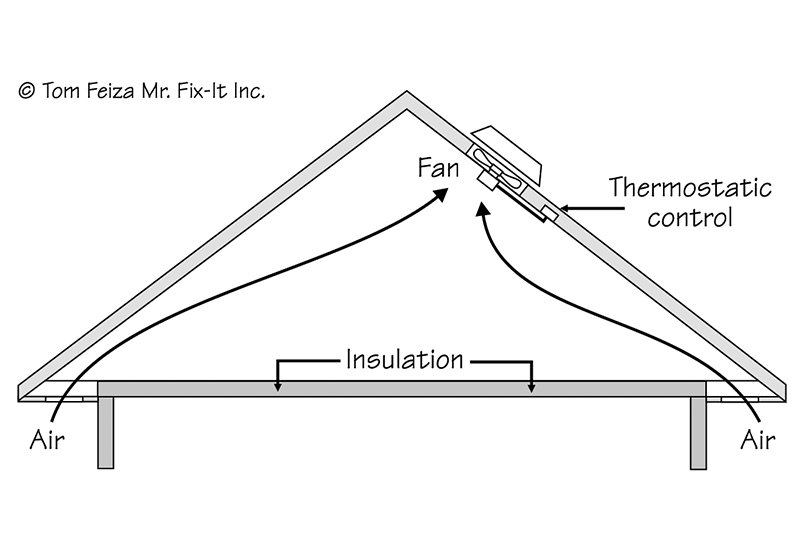
As homes were built with more complicated roof designs and tight envelopes that trap moisture, attic ventilation became an issue. The need to “cool” the attic to supplement air conditioning also became a concern. Solution: the powered attic ventilator! A fan that sucks air from the attic (See Figure 5: Attic Ventilation Fan). The fan control responds to high levels of heat and may include humidity control.
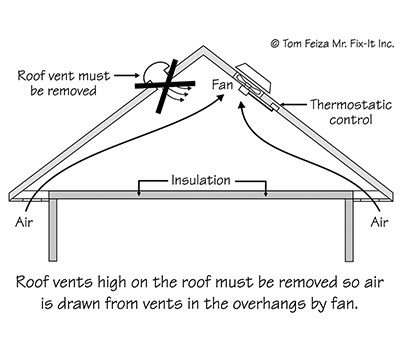
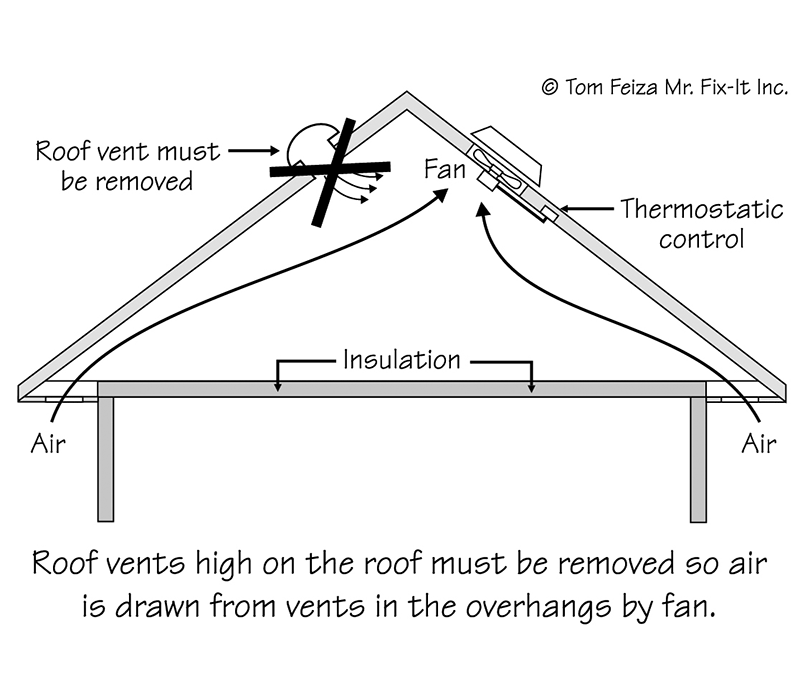
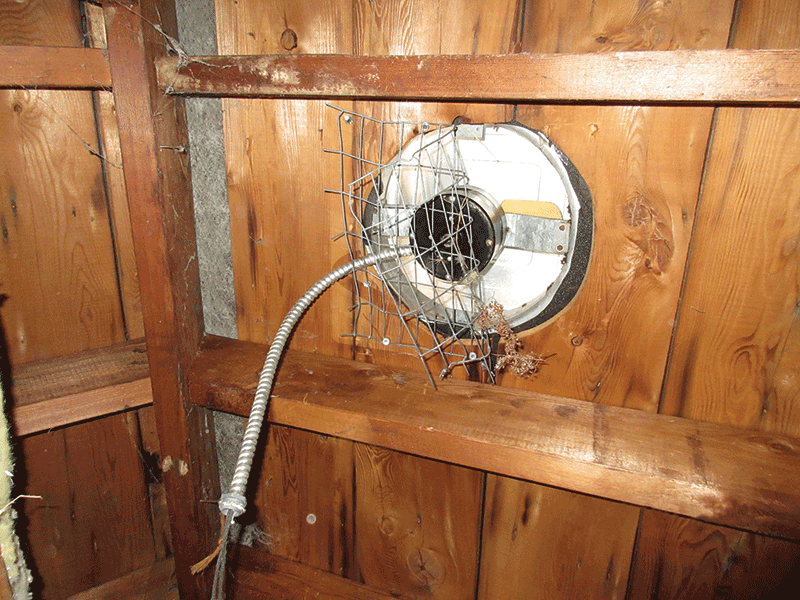
This is a great solution, but most of these fans were installed wrong. (See Figure 6: Attic Ventilation Fan—Installation Problem). When a powered attic ventilator is installed, all the upper vents in a roof must be closed. Yes, all the upper vents including a ridge vent must be closed! The fan pictured below (See Figure 7: Attic Fan with Ridge Vent) sucks air only from the adjacent ridge vent opening, which means the attic still is not ventilated.
Whenever a home has roof vents or gable end vents, they also must be closed to allow an attic fan to vent an attic properly. A lower vent at the overhang will enable complete ventilation.
Enlarge image
Figure 4: Attic Ventilation—Ridge Vent
Enlarge image
Figure 5: Attic Ventilation Fan
Enlarge image
Figure 6: Attic Ventilation Fan—Installation Problems

Enlarge image
Figure 7: Attic Fan with Ridge Vent
OSB Roof Deck Failure—Look Closely!
At one time, a roof deck was one by six or wider dimensional lumber or plywood with dimensional lumber roof joists. Today, OSB (oriented strand board) is king: virtually all new roof decks are made of OSB on a structural roof truss. OSB is a proven product if installed correctly. Nailing, spacing, clips and spans are all important.
How Wide is Wide Enough for OSB?
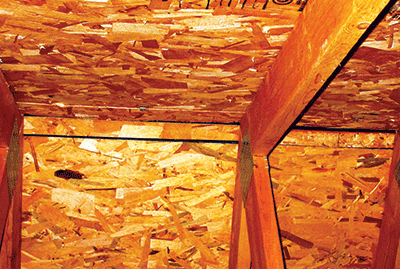
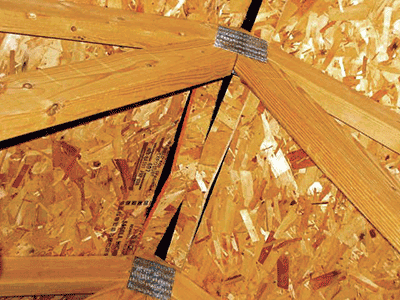
During a visual inspection, we really can’t see fasteners, edge joints and thickness, but we can see the width of the OSB spanning between rafters or roof joists (See Figure 8: Attic Thin Strips of OSB at Ridge Vent). Can you tell whether this narrow strip is properly installed near the ridge of this roof? The OSB has not collapsed or shown obvious signs of failure.
Clips between sheets are installed on only one side of the ridge. What is the required minimum width when we span 24 inches between roof trusses? Installing thin strips of OSB between roof trusses 24 inches on the center just doesn’t seem right.
Failure of Thin OSB Strips
Here’s a more obvious problem (See Figure 9: Attic Failed OSB at Ridge). In this case, the thin strips are about the same width—four inches. The strips, which span 24 inches, are collapsed, bulging and twisting. I don’t see any clips between the sheets of OSB.
OK at the Ridge Vent?
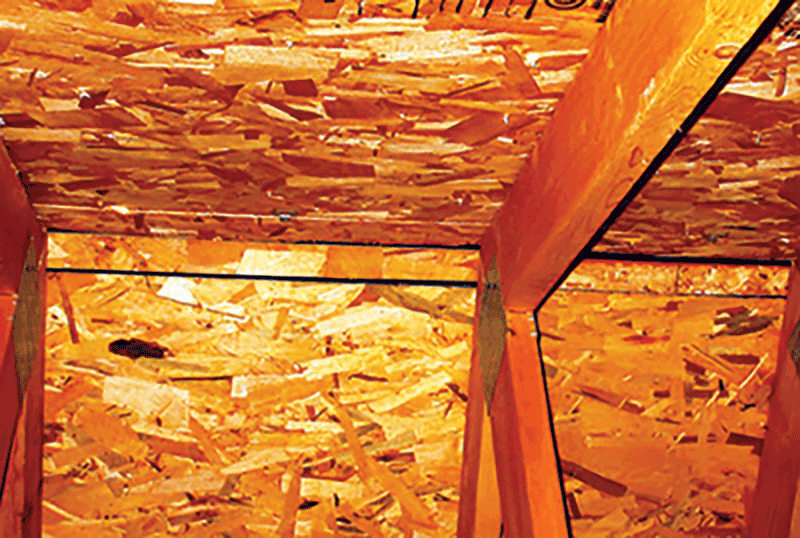
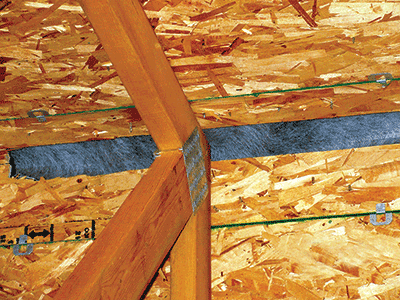
In another case, the OSB strips are a little wider—maybe six inches (See Figure 10: Attic Thin Strips of OSB at Ridge Vent). A two-and-a-half-inch wide gap was cut for the ridge vent. The clips are also visible. Is this OK?
Enlarge image
Figure 8: Attic Thin Strips of OSB
Enlarge image
Figure 9: Attic Failed OSB at Ridge
Enlarge image
Figure 10: Attic Thin Strips of OSB at Ridge Vent
Let’s Check OSB Construction Standards
I spent some time checking design standards for OSB roof decks, and I quizzed several wood engineering scientists. I learned that the general standard for OSB roof decking requires a minimum width of 24 inches. This assumes that a roof truss system has the typical 24-inch spacing between trusses and a typical OSB thickness. If the panel width is less than 24 inches, panel clips or lumber blocking is suggested.
If the width is less than 12 inches, special blocking and support for both edges is required. When installed at a ridge vent, one edge must be supported by blocking.
Attic Structure—Look for Stains, Rust, Rot and Mold
The wood structure and framing below the roof should be free of excessive stains, rusty nails, mold, rot and movement. Trusses and joists should be in alignment without cracks, excessive sagging or movement. You don’t need to walk in an attic without a floor and many times you can see issues from the attic hatch. When I see an issue from the hatch, I often enter the attic for a closer look if safe access is possible.
Watch Your Step
When peering into an attic, keep in mind that gaps in the insulation could indicate the existence of a dropped soffit or a stairway. Watch for moisture issues. Make a report notation for gaps in the insulation and the vapor barrier. Check for proper air sealing at the chimney, plumbing and electrical penetrations if they are visible. And if you ever walk/crawl around an attic, remember that gaps can be quite large, and there may be no framing to support you in areas hidden by the insulation.
The Takeaway
During your inspection of the attic, always note excessive stains, organic growth, improper bath and kitchen fan venting, delaminating plywood, thin strips of OSB, excessive nail rust, and improper attic venting. Look for blocked vents or an inadequate number of vents.
Any visible failures need to be identified in your report: failed OSB, rot, missing insulation, structural failure and movement, and all roof deck issues.
An accumulation of questionable items such as minor stains, lack of insulation, poor air sealing, and lack of a continuous vapor barrier should be evaluated by an expert. If you recommend additional or improved insulation to meet industry standards, ALWAYS recommend evaluating and improving the air sealing. Air sealing is often neglected even when additional insulation is installed by the low bid “blow and go” insulation contractor. Air sealing was never considered in construction prior to 1980. Now with our tighter, more efficient “wet” homes, air sealing is essential.
If you have limited or no access to the attic, carefully document the limited access and the reason for it. Access may be limited by no access panel or an access panel that is caulked shut or hidden by storage in a closet. Never skip the attic inspection—you may be the only person who looked in that hot, unfriendly attic in the last 20 years.
About the Author
Tom Feiza has been a professional home inspector since 1992 and has a degree in engineering. Through HowToOperateYourHome.com, he provides high-quality marketing materials, books for homeowners, and illustrations that help professional home inspectors educate their customers. Copyright © 2023 by Tom Feiza, Mr. Fix-It, Inc. Reproduced with permission.
Visit HowToOperateYourHome.com for more information about building science, books, articles, marketing, and illustrations for home inspectors. E-mail Tom at Tom@htoyh.com with questions and comments, or phone (262) 303-4884.

OREP Insurance Services, LLC. Calif. License #0K99465