

 |
> E&O/GL Insurance for Home Inspectors Competitive Rates, Broad Coverage, Free Risk Management, online inspection support for tough questions, discounts on education and more... Professional Coverage, Competitive Pricing Shop OREP today! |
>> Editor’s Note: To help you stay up-to-date and connected, OREP/Working RE has established a Coronavirus (COVID-19) Discussion and Resource Page where you can share your thoughts, experiences, advice and challenges with fellow inspectors. See what Inspectors are saying here!
>> Take the Coronavirus: National Home Inspector’s Survey. Provide your industry feedback.
Don’t Miss the Shingle Stagger!
The Science Behind Your Inspection
by Tom Feiza, Mr. Fix-It, Inc. HowToOperateYourHome.com
Do asphalt roof shingles really stagger? In my part of the country, they do. Stagger is a term some roofing contractors use for the shingle offset—that is, the spacing between butt joints of adjacent shingles. Some contractors call it “shingle offset” or “edge-to-edge spacing.” I like to call it stagger like the local boys do.
No matter what you call it, maintaining shingle stagger is really important to prevent roof leaks and to conform with manufacturers’ instructions. See Figure 1: Shingle Spacing – Typical and Figure 2: Shingle Spacing, Starter, Deck as these are graphic representations of this technique.
If the shingle stagger is too small—less than 4 inches—water can travel into the shingle butt edge to the butt edge joint of the shingle below (less than 4 inches away) and leak in. You know what leaks cause: rot, mold and lawsuits. Do you check the shingle stagger when you inspect roofs? How do you check it on modern laminated shingles? Checking the old three-tab shingles was easy, but things have changed.

Figure 1: Shingle Spacing – Typical
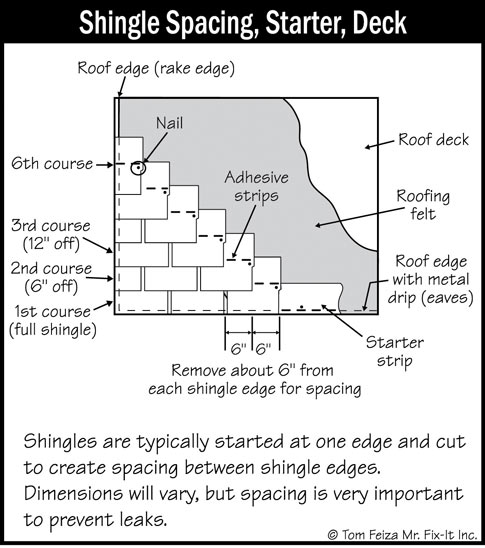
Figure 2: Shingle Spacing, Starter, Deck
Why do I miss the three-tabs? Because they were easy to inspect. The tabs were about 12 inches wide and separated by a slot. When installing a roof, the contractor just cut about 6 inches off the edge of the starter of each row of shingles, creating a simple stagger. When there are three-tab shingles on a roof, you can easily see the alignment of the tabs/slots and the edges of the shingles. This makes it easy to check the stagger. (See Photo 1: Three–Tab Shingles).
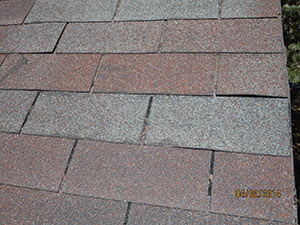
Photo 1: Three-Tab Shingles
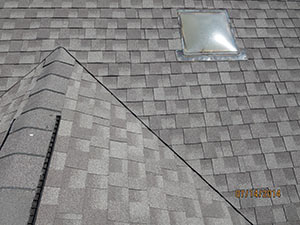
Photo 2: Laminated Shingles
In fact, unless there was a really unusual pattern of tabs or slots, I never checked the stagger with three-tab shingles, because it was always right. Maybe the contractors or DIYs got it right because the three-tab shingles were easy to install, or maybe because mistakes with stagger were easy to see. The slots just didn’t look right if the spacing was off…and the DIY’s wife could see it from the ground.
The new laminated shingles (Figure 3: Laminated Shingle Nailing, and Photo 2: Laminated Shingles) have no tabs and no slots. When the shingles are properly installed, it is very difficult to locate the shingle butt edge. In fact, some shingles seem to have laminations that even cover the butt joint. Improper offset or stagger will allow leaking and will be very hard to detect visually.
You should really step back and look at your pricing before you ever hire a new inspector. Why do we say that? Well, imagine that you are charging $300 per inspection (way too low by the way). But if you do 500 inspections a year, your gross revenue is $150,000. So instead of hiring another home inspector at that point, why not raise your prices? Let’s say you raised your prices slowly up to $400 per inspection. Even if you lost 100 inspections a year because of your price increase, you would make $10,000 more a year and work less. That would also set you up to make more when you hire a new inspector. However you cut it, be sure that you have enough inspections AND revenue to make it profitable to hire another inspector.
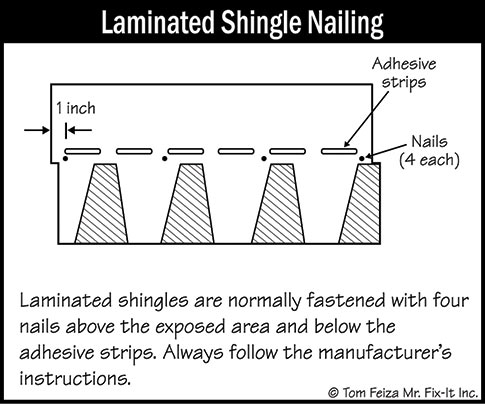
Figure 3: Laminated Shingle Nailing
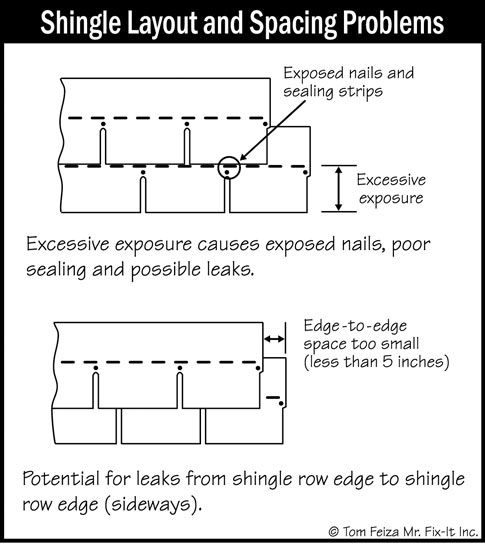
Figure 4: Shingle Layout and Spacing Problems
Stagger Is Important
If the stagger (offset) is not adequate, rain can move through the edge of the shingle to the edge of the lower shingle, creating a leak. This is especially problematic in wet climates, areas with heavy rain or areas with freeze-thaw cycles, and with lower slope roofs.
The old “English” measurement three-tab shingles were about 36 inches wide, and the stagger was about six inches. The “metric” shingles are about 40 inches wide, and the stagger is still about six inches. If you mess up the stagger, the shingle tabs/slots will not look properly aligned, (Figure 4: Shingle Layout and Spacing Problems) and this is very easy to spot during a visual inspection.
With laminated shingles, the stagger ranges from six to 15 inches, depending on the type of shingle and the shingle manufacturer’s instructions. In a few cases, manufacturers may allow four inches, but that is not common. With laminated shingles, the appearance might change if the stagger does not follow the manufacturer’s directions, but this is often hard to see during inspection.
Check Offset and Pitch
Shingle offset (stagger) of less than four inches makes the roof prone to leaking. On architectural shingles I am always looking for shingle edges and visually measuring the edge-to-edge spacing. In my work as an engineer and roofing consultant, I have seen roofs with stagger of less than four inches, and they leak—random leaks right through the roof.
The pitch of the roof also affects roof leaks when there is a small stagger. The lower the pitch of the roof, the more it is prone to leaks. Remember that asphalt shingles shed water and do not constitute a membrane. Ice on the roof also limits the roof’s ability to shed water and can compound the leak and stagger problem.
What do you do when a roof leaks due to improper stagger? You tear the whole thing off and start over. It’s an expensive defect. It’s also difficult to detect in a laminated shingle unless you know what you’re looking for.
(story continues below)

(story continues)
I provided consulting on a huge laminated shingle roof over an indoor pool attached to a 3,500-square-foot home; this amounted to about 7,000 square feet of roof on which the stagger was as little as two inches, and the roof leaked in random locations. Due to leaking, this voided the warranty. The whole roof needed a replacement because the shingles were not properly installed, and also the attorneys made some money.
Inspecting Laminated Shingles
To inspect laminated shingles for stagger, locate the edges of shingles in adjacent rows. Often this is difficult, but with a little practice you will notice subtle changes in appearance at the edge. At times I slightly lift an edge to be sure it is an edge and not just a lamination over a base felt. Remember that butt edges are a straight cut, perpendicular to the lower edge of the shingle. Edges of laminations are often cut at an angle.
Measure from edge to edge of adjacent shingles. (Photo 3: Stagger 1.5 inches). If it looks too small, use a ruler and start taking pictures. Once you have checked a few shingles, you can almost be assured that the whole horizontal row of shingles will be correct. You must check for stagger on each roof plane.
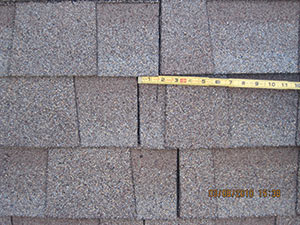
Photo 3: Stagger 1.5 Inches
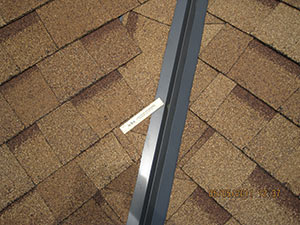
Photo 4: California Valley
If the stagger is off, you may also notice an irregular pattern in appearance. At times this is visible from the ground when viewing a larger area.
Always Be Suspicious of “California” Valleys
A “California” or “Long Island” valley is one in which a vertical shingle is used to line the edge of the valley. (Photo 4: California Valley). It could be an open metal valley or a closed cut valley. You will notice a shingle laid parallel to the valley and then rows of shingles laid over the vertical shingle to the rake edge. You will see the laminated edges of the vertical shingle in the valley. I anticipate installation problems with this California valley because the rows of horizontal shingles are often just started in the valley and the stagger is too small. The roofing contractor is saving time and material by not trimming the shingle edge for proper stagger. It looks good, but it can leak.
The Role of Manufacturers
Can the manufacturer help? I have found that manufacturers and their local representatives are useful resources for technical information. But when it comes right down to evaluating a shingle installation issue, they are often reluctant to criticize their customer, the roofing contractor. And that makes good business sense. They also may waffle a little with their statements. They guarantee their shingles for performance, but if leaks occur because of improper installation, this voids the warranty. Most manufacturers’ instructions for installing asphalt shingles don’t mention the California valley, but I have seen references to this type of installation in trade journals and instructions.
What’s a Home Inspector to Do?
Always check for stagger with laminated shingles. Watch for those California valleys; at least the stagger is easy to see at the edge of the valley. Unfortunately, is it difficult to visually identify a stagger issue unless you are on the roof looking down at the shingles. If the stagger is five inches or less, start to look closely, documenting the condition and warning the buyer. If the stagger is four inches or less, document the condition, suggest that there is a potential for leakage, and refer the condition to a professional roofing contractor for further evaluation. Carefully check the attic and ceilings for leaks.
I suggest that the buyer ask the homeowner to document in writing the type of shingles, the name of the roofer and the installation requirements and warranties. Have the buyer make the seller responsible for the roofing issues. You are not paid to be responsible for improper roof installation. Don’t accept that responsibility. Do a little research. Gather and review a set of shingle manufacturers’ installation instructions for shingles commonly used in your area. You can find these instructions on the manufacturers’ websites. The Asphalt Roofing Manufacturers Association (www.asphaltroofing.org) also provides excellent reference materials. Carry the instructions with you to use as a reference. I provide the manufacturers’ instructions to customers when there is an issue. Installation instructions are also printed on every bundle of shingles. You can often find a spare bundle of shingles in the garage to identify the manufacturer and type of shingle.
Also, review these instructions in detail to see what they say about stagger. They may call it “offset,” but checking the shingle stagger is much more fun! Be knowledgeable about shingle stagger, because some contractors and some DIYs aren’t.
About the Author
Tom Feiza has been a professional home inspector since 1992 and has a degree in engineering. Through HowToOperateYourHome.com, he provides high-quality marketing materials, books for homeowners, and illustrations that help professional home inspectors educate their customers. E-mail Tom (Tom@htoyh.com) with questions and comments, or phone (262) 303-4884. Copyright © 2021 by Tom Feiza, Mr. Fix-It, Inc. Reproduced with permission.
OREP/WRE Coronavirus Discussion and Resource Page
Coronavirus: National Home Inspector Survey
Free Risk Management Online Course Claims and Complaints: How to Stay Out of Trouble
Available Now
Presenter: David Brauner, Senior Insurance Broker OREP
David Brauner, Senior Broker at OREP, shares insights and advice gained over 25+ years of providing E&O insurance for inspectors, showing you how to protect yourself and your business. Watch Now!
Note: The Winter/Spring 2021 issue of Working RE Home Inspector is mailing now to over 25,000 home inspectors nationwide. OREP Insureds enjoy guaranteed delivery of each print magazine and many more benefits.
by Jack Sanders
What a fantastic insight into the importance of shingle staggering in roofing! The explanation about how even slight misalignments can lead to significant problems down the line was especially eye-opening. As a general contractor, it’s always valuable to revisit the basics, and this is a great reminder of how precision in installation affects the longevity and durability of roofing systems. I can definitely see how this would apply in home renovations where every detail matters.
I’m curious, though—when working on home renovations with older structures, have you encountered challenges with achieving proper shingle staggering, particularly with older roofing materials that might have settled or shifted over time? I’d love to hear your thoughts!
-